This tutorial shows how to begin using the Microsoft Visual Studio .NET Debugger to debug 32-bit assembly language programs running in Protected mode.
This debugger lets you do the following:
- Step through your program, viewing the source code
- Set breakpoints in your code
- View CPU registers and flags
- View a disassembly of your program
- Watch the values of program variables
- View the runtime stack
- Display blocks of memory
- Perform remote debugging across a network
This will be a hands-on tutorial, so you can learn the most if you follow each step.
Open the Visual Studio Project file
In this step-by-step tutorial, you will open the sample project and insert an example program named AddSub2.asm.
- Go to the Examples\ch03\Project_Sample folder in the disk directory that contains the book's sample programs. Ordinarily, the full path will be c:\Irvine\Examples\ch03\Project_Sample.
- Double-click the file named Project.sln.
- In The Solution Explorer window, right-click main.asm and select Remove. When prompted by a dialog window, click the Remove button.
- Right-click Project in the same window, select Add, and select Existing Item.
- Select the file named AddSub2.asm. It will be added to your project.
- Select Save All from the File menu to save your project settings.
- Double-click the AddSub2.asm filename in Solution Explorer to open it in the editor. Here's a partial listing:
.data
val1     DWORD  10000h
val2     DWORD  40000h
val3     DWORD  20000h
finalVal DWORD  ?

.code
main PROC

	mov  eax,val1       ; start with 10000h
	add  eax,val2       ; add 40000h
	sub  eax,val3       ; subtract 20000h
	mov  finalVal,eax   ; store the result (30000h)
	call DumpRegs       ; display the registers

	exit
main ENDP
END main
Build the project by selecting Build Solution from the Build menu.
Start the Debugger
Press the F10 key to start the debugger. Your environment should appear as follows, except that your window configuration may be different:
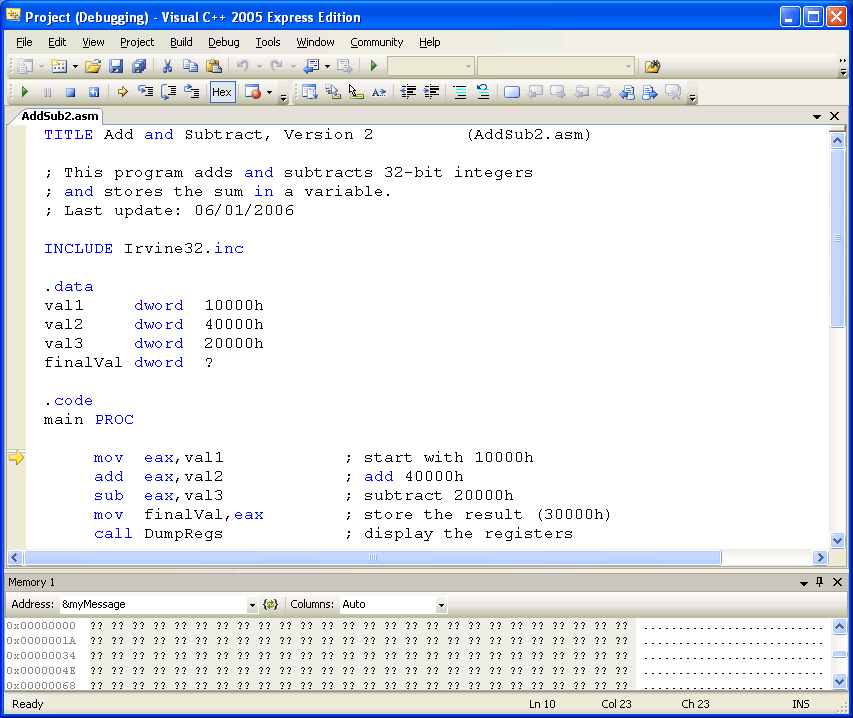
Don't worry if some of the windows shown here do not appear on your screen. You can open and close them at will. First however, let's take a tour:
Source Window
The Source window displays the program's source file. Note that the first MOV statement has a yellow arrow next to it. The arrow always indicates the next statement that's about to execute.
| Tip: You can remove any debugger window by right-clicking on its Tab and selecting Hide. You can open any debugging window by selecting Windows from the Debug menu. |
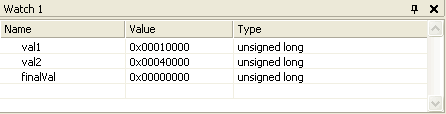
Watch Window
Select Windows from the Debug menu, and select Watch 1. A Watch window is like an electronic spreadsheet that displays the names and values of selected variables. As you step through a program, you can see variables in this window change value. Currently the window is empty, but you can drag any program variable into the window with your mouse.
Click on the tab at the bottom of the screen labeled Watch 1 to bring it to the front. Drag the val1, val2, and finalVal variables into the Watch window and note their current values. The values are currently displayed in decimal, so select hexadecimal format by right-clicking on the watch window and selecting Hexadecimal Display from the popup menu. Following is a sample:
Memory Window
Select Windows from the Debug menu, and select Memory. The Memory window displays a raw dump of memory in either hexadecimal or decimal. It is particularly useful when working with array variables. Since we don't have any arrays in the program, let's display the value of val3. Next to the Address label, type: &val3
The & before the variable name means to interpret the variable name as an address. In assembly language, all labels are implied addresses. Variable names are case-sensitive in the debugger.
The Memory window displays a series of individual memory bytes, beginning at the address of val3. Right-click on the window, and select 4-byte Integer. Along the left side of the window is shown the address of the first value in each line:
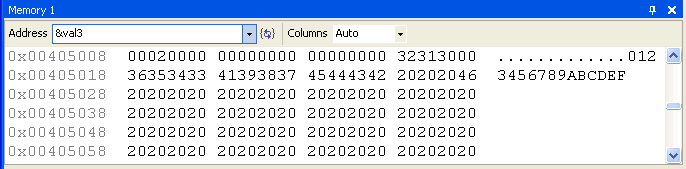
In our sample, val3 is located at address 00405008, although your addresses might be different. You can also type a hexadecmal constant into the Address field. Use the C-language format, where the digits are preceded by "0x". For example: 0x0040400C.
(The Memory window resets its address to a default value when you restart the debugger.)
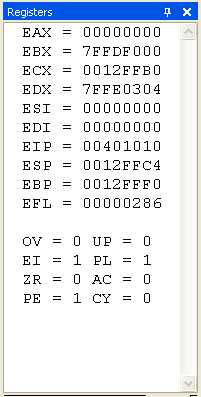
Register Window
Select Windows from the Debug menu, and select Register. The Register window displays the contents of the CPU registers. The flag values do not show by default, but you can add them in by right-clicking and selecting Flags:
 |
Key to flag abbreviations
|
Disassembly Window
Select Windows from the Debug menu, and select Disassembly. The Disassembly window displays a raw listing of the program's code. In some programs, it will show code generated by macros or by high-level MASM directives (such as .IF, in Chapter 6). Right-click the disassembly window and note the various display possibilities (your list may vary slightly):
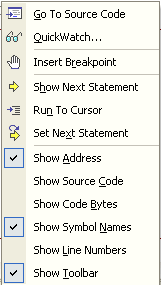
Here is a sample, in which Show Source Code is disabled and Show Symbol Names is enabled:
--- AddSub2.asm ----------------------------------------------------------------
main:
00401010  mov         eax,dword ptr [val1 (405000h)]
00401015  add         eax,dword ptr [val2 (405004h)]
0040101B  sub         eax,dword ptr [val3 (405008h)]
00401021  mov         dword ptr [finalVal (40500Ch)],eax
00401026  call        DumpRegs (4011F5h)
0040102B  push        0
0040102D  call        ExitProcess (401D30h)
The offset of each variable apears next to its name. The exit statement in the source code listing has been translated into a call to the MS-Windows ExitProcess function. This is explained more fully at the bottom of page 75 in the book.
Step Over (F10)
Let's step through the program using the F10 function key. As you press F10, watch the yellow arrow in the Source window move from statement to statement. Notice the following as you step through the program:
- Individual register names (in the Register window) turn red, indicating that they have been modified. The AddSub2 program modifies the EAX and EIP registers quite a bit, as you can see.
- Variables in the Watch window turn red when they are modified.
- Memory locations in the Memory window turn red when they are modified.
As soon as you step past the call DumpRegs statement, click on the black MS-DOS icon on the Taskbar at the bottom of the screen. You should see the program's output, which is a register display.
When you reach the exit statement and press F10, the debugger halts.
Step Into (F11)
Another way to step through a program is to use the Trace (F11) command. It steps down into procedure calls. In contrast, the F10 key just executes procedure calls without tracing into the procedure code.
Stopping and Restarting
It's easy to either stop or restart your program inside the debugger while you're in the process of stepping through a program:
- To restart the program, select Restart from the Debug menu. The program is reloaded into memory, so any changes previously made to variables in the Watch window are undone. Also, you have to retype the name of your variable in the Memory window, because it resets itself to a default address.
- To stop debugging in the middle of a program, select Stop Debugging from the Debug menu.
Tips
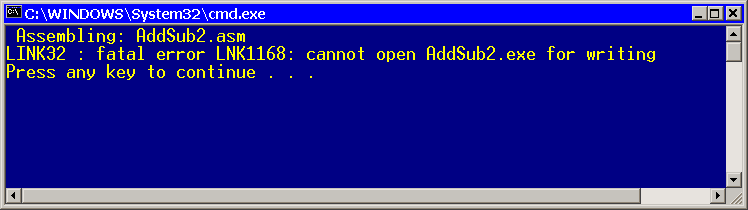
Be sure to stop the debugger before trying to modify and re-assemble your program's source code. Otherwise, the linker will refuse to assemble your EXE file, indicating that it's currently in use:
The End